HOW TO INSTALL
The process of creating a custom made shade sail structure involves 5 key steps:
1. PLANNING – Start with careful planning of your structure.
2. INSTALLING FIXING POINTS – Proceed to install the necessary fixing points (posts/brackets, etc.).
3. MEASURING – Accurately measure the designated area.
4. ORDERING – Place an order for your shade sail.
5. INSTALLING SHADE SAIL – Conclude by installing your shade sail.
By following these steps, you will create an excellent shaded environment.
Step 1 - PLANNING
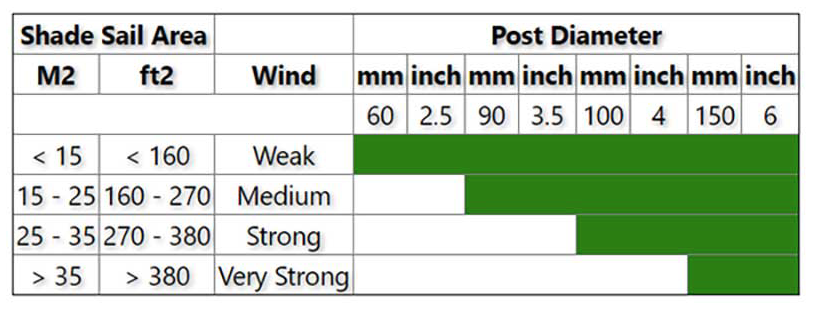
Planning your structure involves several important considerations, and in fact, this is the most important aspect of the entire process. Effective planning is the key to ensuring that your shade sail structure functions as intended. You likely have a specific area in mind that you want to shade, whether it's a paved space, a courtyard, a deck, a pool area, or any other location. While the area is known, the exact approach may still be uncertain. You may have opportunities to create attachment points for your sail on existing structures, or you might need to install steel or aluminum posts to establish a completely freestanding structure. Below are numerous factors you should take into account during the planning phase:1. Movement of the Sun
The sun follows a daily path, rising in the east and setting in the west. Throughout the changing seasons, it transitions from a lower position in the sky in cooler months to a higher point during summer. Your structure should be strategically designed to offer maximum shade protection during the peak of summer, or the summer solstice, when shade is most essential.
2. Sail Design & Architectural Twist
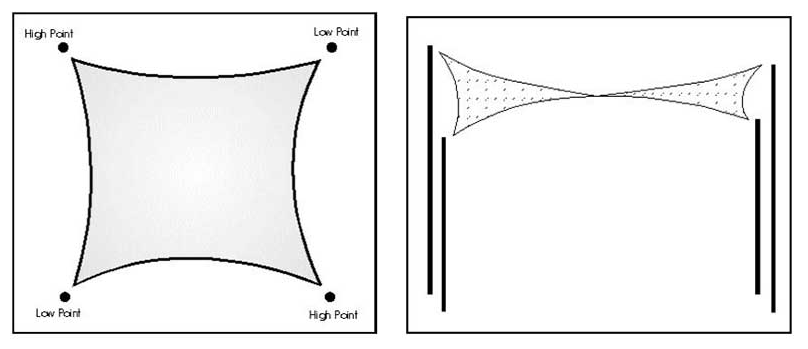
Sails work best when they are designed with a deliberate “twist” or architectural hypar effect. This involves positioning the fixing points, whether steel posts or brackets, at varying heights, resulting in a twist in the sail’s shape to fit the designated area. A flat sail is more challenging to tension correctly and can, during heavy rainfall, trap and retain water for extended periods, exerting excess load pressure on the fixing points. Moreover, from an aesthetic perspective, flat sails tend to appear boring. We recommend installing fixing points with diagonally opposite high and low points to alleviate these issues and achieve an appealing visual effect as shown below:

3. Sail Size
As you may have noted in the images above, the shade sail is intentionally smaller than the space between the supporting columns. To achieve complete tension in the shade sail, there must be some clearance between the sail and the fixing points to accommodate rigging tensioners and create catenary curves along the sides of the sail. In the case of larger sails, these tension gaps and catenary curves must be sufficiently large to ensure maximum tension and, consequently, maximize the sail’s longevity.
For this reason, we strongly advise that you position your fixing points at a reasonable distance from each other, greater than the actual shaded area you intend to cover. As a general guideline, your sail should commence approximately 300mm away from the fixing point, although this distance may vary depending on the size of your sail.
4. Fixing to Existing Structures
Caution is essential when considering the attachment of your shade sail to existing structures, including your house. During poor weather and strong winds, the stresses exerted on the fixings by the sail can be substantial and should be taken seriously. To confirm that your existing structure can safely bear these loads, it may be advisable to seek guidance from a local engineer or a qualified builder. For optimal safety practices, consider taking down your sail when high wind conditions are predicted.
5. Timber vs. Steel
We advise the use of steel or aluminum posts for your sail structure instead of timber posts. Steel offers superior strength, minimal deflection (bending from the ground up), and is impervious to rot. Rust concerns can be mitigated by employing galvanized steel or aluminum. It’s worth noting that steel is inherently stronger than aluminum and is typically more cost-effective, although this can vary by location. That being said, if you are willing to periodically take down your sail or if it will be used only on specific occasions, many of our customers have effectively utilized timber posts.

6. Post Footings
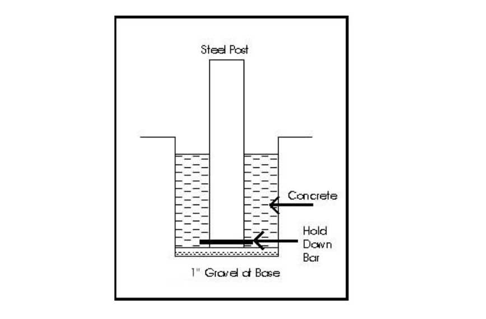
The required footing sizes depend on the size of the structure and the height of the post above the ground. An old and conservative engineering principle is “1 third in, 2 thirds out,” which implies that posts extending 2400mm (8 feet) above the ground should have a minimum depth of at least 1200mm (4 feet) into the ground. While this is often regarded as conservative, we strongly recommend adhering to this principle. This is because correcting a post that has leaned over in high winds due to an undersized footing can be a challenging, sometimes impossible task. Even a slight shift in your footing can compromise the ability to tension the sail, reducing its potential longevity.
If you are digging through landfills or raised garden beds, the depths of these areas should not be included in the overall depth of the footing. The ideal scenario is as follows:

As a general guideline, hole diameters should be approximately 350mm, with an increase corresponding to larger column sizes. Nevertheless, it’s crucial to emphasize that depth is the most critical factor to consider.
7. Underground Services
Before digging holes for your footings, make sure the area is free of underground utilities such as sewage and water plumbing, as well as electrical cabling. Damaging these services can be hazardous and costly to rectify. If you don’t have access to plans showing the location of underground services, consider conducting a services search before beginning excavation.
8. Local Authorities
Additionally, it’s essential to consult with your local authorities regarding any applicable building regulations that may impact your shade sail structure. Once you’ve meticulously planned your shade sail structure, you can proceed to the initial installation phase, which involves setting up your fixing points.
Step 2 - INSTALLING FIXING POINTS
After addressing the considerations outlined in step 1, the next step is to install your fixing points. As previously emphasized, it's crucial not to underestimate the significance of maintaining conservative footing dimensions. A properly installed shade sail can provide effective and cost-efficient shading for many years. Additionally, when attaching your sail to existing structures, exercise a high degree of caution as discussed in Step 1 above. The more conservative your approach during these initial phases, the longer the lifespan of the sail structure you construct.Step 3 - MEASURING
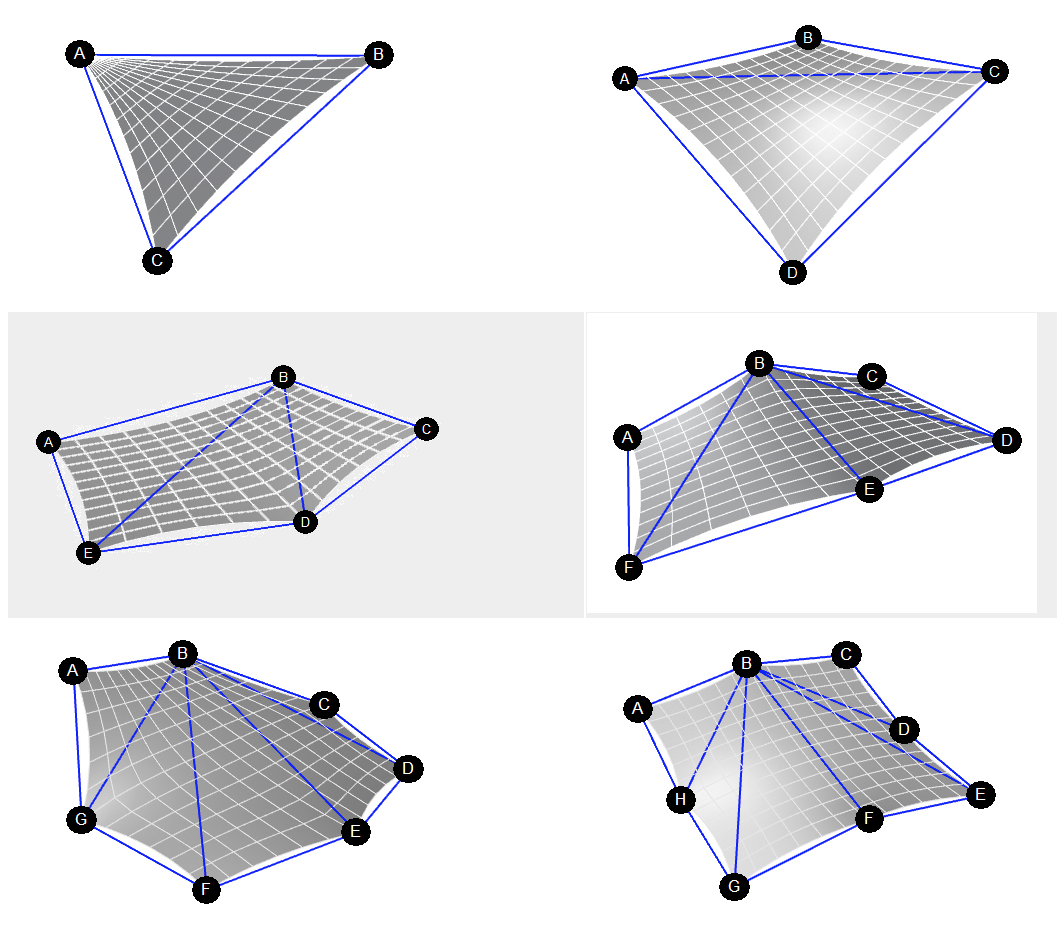
In order to manufacture a high-quality custom made shade sail, we require quite comprehensive measurements from our customers. In the process of "triangulating" the sail construction, we automatically consider variations in fixing heights and the required angles to create your product effectively. This includes diagonal measurements, as illustrated in our measuring guides. Properly creating your custom shade sail would not be feasible without these measurements, so we strongly recommend that you invest the necessary time to obtain these measurements accurately and thoroughly.To assist you, we've provided templates at the end of this guide that correspond to our diagrams for 3-sided, 4-sided, 5-sided, 6-sided, 7-sided, or 8-sided sails. Take the relevant measurements from one fixing lug to another and be sure to include the diagonals, as they are essential. READ MORE ABOUT HOW TO MEASUREStep 4 - ORDERING
We offer both pre-made and custom made shade sails. And to make your life a bit easier, you can order our pre-made shade sails straight from our webpage. But if you didn't find a suitable size among the pre-made shade sails, we'll gladly make you a custom one. For custom shade sails we do need a bit more details, so this process will take a bit more time, but it's all worth it at the end. In our ORDER HERE page you can find CUSTOM SHADE SAIL QUOTE section, where you can easily enter your measurements, your required fabric colour, and your selection of stainless steel fittings or none, and you will have a custom made shade sail quotation within 24 hours. ORDER HEREStep 5 - INSTALLING SHADE SAIL
Once your sail is fabricated to our highest quality standards and sent to you, the installation process is eminent. This process is also extremely important in ensuring maximum longevity of your product.Here are the steps we recommend following:
1. Lay out and attach your components
If you’ve ordered fittings, each sail point will come with a combination of shackles and turnbuckles. Extend the turnbuckles fully, and use the shackles to link the turnbuckle to the sail’s corner points.
2. Attach your sail
Fix your turnbuckle, which is already attached to your sail, to the appropriate fixing lug on your fixing points. At this stage, keep the turnbuckles fully unwound until all points have been connected. Progress from one point to another until all sail points are fixed as required.
Please note: In the manufacturing process, we’ve accounted for the possibility that the fabric may stretch. Consequently, significant force will be necessary to pull the last points to bring them near the fixing points. We assure you that this is the most effective way to manufacture your product, even if you believe your sail might have been constructed too small. We recommend considering the creation of a quasi-pulley effect to hoist the last points. You can achieve this by fastening a rope to your sail’s corner point and looping it back and forth to the relevant fixing point.
If you have access to purpose-built pulley systems like block and tackle, we strongly recommend using them. Carry on with this process until all fixing points are positioned. Keep your turnbuckles fully unwound throughout this process.
3. Tension your turnbuckles
Now, go from one point to another and adjust the tension of each turnbuckle as needed. As mentioned earlier, the longevity of your sail product depends almost entirely on how well you maintain tension in the sail. The sail materials, perimeter webbings, and corner fixings are engineered to withstand very heavy loads, so don’t hesitate to pull the sail up extremely tight.
Note that if you are using your sail for temporary purposes only and will be installing and removing it regularly, the tension aspect for longevity is not as crucial. However, if it happens to be a little windy, try to maintain as much tension as possible, as the constant gusty movement of the sail could eventually damage the corners and compromise the entire structure.
And that’s it! Your shade sail area is now complete, so sit back, relax, and enjoy!
FOR MORE DETAILED INFORMATION PLEASE ALSO LOOK AT HOW TO MEASURE PAGE.
Please ensure that all measurements are provided in MILLIMETRES, depending on the common method used in your country. While your shape may not exactly match the following diagrams, please choose the visual diagram that most closely represents the number of sides your sail has. The measurement of the diagonals, as indicated, allows us to plot and cut your sail accordingly.

